Page 3 of 3 FirstFirst 1 2 3
Results 31 to 45 of 45

Thread: Window fixin' party

  1. #31
    It was a great time; my thanks to Tom for organizing and the work.

    My window had tabs completely broken off, and discovered was a replacement window. window now goes up, but still crooked like it did before it broke. I think it is catching on the front guide rail. I'll try to widen.
    blujfan9293
    Clinton, IL (near Bloomington)

  2. #32
    Member Since
    Feb 2007
    Location
    2000 Proton VX - 0776
    Posts
    9,258
    Thanked: 0
    Thanks to all who showed up - I had a great time. Jamie says 'Hi' to everyone. She went back to college last night. Bren says 'Hi' & sorry she missed everyone.

    I tried out my window Sunday morning (I couldn't wait 24 hours like I recommended to everyone else). The black RTV seemed to hold very well though. My window still tilts just enough to come out of the rear weatherstrip. Rekin I'll be widening my tracks too. It is much improved from what it was before. I'll try not to procrastinate so I can provide an update soon.

    Lets all start thinking about the next meet. I'm thinking the Regional Park in Lorton so that I can bring the SeaDoos out for everyone to have some fun. I'll pick a weekend & start a new thread on the calendar.

    I'll try to post a few pix tonight. We had a birthday party for my grandaughter & my son yesterday & I forgot to bring the memory card from my camera to work with me today.

    Tom
    [SIGPIC][/SIGPIC]

    Put a smiley after you say that Bub.

  3. #33
    Member Since
    Feb 2007
    Location
    2000 Proton VX - 0776
    Posts
    9,258
    Thanked: 0
    For some reason, I'm not able to load the pix. You can see them here:

    http://pbase.com/tom4bren/090530_window_fixin_party

    I'll try to post a sample later.

    Those that showed up without cameras, you can download from there in small, medium, large or original size.

    Tom

  4. #34
    Member Since
    Jul 2008
    Location
    1999, Astral Silver, VX, 1508
    Posts
    523
    Thanked: 0
    Well, I rolled down the left front window this morning and the window went cockeyed as it finally broke off the bracket(s) . Looks like my window fixin party is solo in San Diego in 1-2 weeks as I ordered my brackets from SBC. Unless I missed it checkin' through the threads, is the Liquid Nails one tube color (in the pic) or are they all the same color and need to buy a certain application?
    Larry S.
    99 Astral Silver VX (176k)
    91 Porsche 928 S4 (73k)

  5. #35
    Member Since
    Nov 2004
    Location
    former 2001 Dragon Green VX #0319
    Posts
    27
    Thanked: 0
    Thanks again Tom for all of your hospitality, great food and window fixing expertise. I haven't rolled mine down yet but am confident that it will work just fine now. It was really surprising to see the different states of the original brackets in each of the VXs. Looking forward to the next get together.

    Here are a couple of photos....

  6. #36
    Member Since
    Feb 2007
    Location
    2000 Proton VX - 0776
    Posts
    9,258
    Thanked: 0
    turbo,

    I used black RTV on the ones we did last weekend. I chose the RTV instead of liquid nails since I am familiar with it's characteristics and was confident in not only the strength but also in it's ability to adhere to glass. I didn't want to use the liquid nails since it cures hard and I wanted the option of being able to remove the bracket later if needed.

    Tom

  7. #37
    Member Since
    Jul 2008
    Location
    1999, Astral Silver, VX, 1508
    Posts
    523
    Thanked: 0
    I like that option too so it sounds like black RTV is the trick! Thanks!!

  8. #38
    Member Since
    Nov 2004
    Location
    former 2001 Dragon Green VX #0319
    Posts
    27
    Thanked: 0
    Well I was patient enough to wait a week for the sealant to fully dry and WOW, the window works great. It is better than new and goes up and down very quick and perfectly straight. Wish I would have done this repair long ago.

    For anyone else out there that has been hesitant to try this, don't put it off.

  9. #39
    Member Since
    Feb 2007
    Location
    2000 Proton VX - 0776
    Posts
    9,258
    Thanked: 0
    Good news for those that needed it:

    TheGanzman posted this in another thread:

    "For the record, I bought a set from Merlin recently - they're ~$4.00 apiece..."

    He's talking about the vapor barrier.

  10. #40
    Member Since
    Jun 2002
    Location
    2001, Proton Yellow, VX, 1379 (sold)
    Posts
    994
    Thanked: 0
    I finally got around to uploading the videos to Youtube. The first one (removal) wouldn't complete processing in HD, so I had to convert it to lo-rez.

    Window Removal
    Window Prep Pt1 (Fun with power tools)
    Window Prep Pt2 (Doing it the easy way)
    Window Install (Simple as 1-2-3)

    These are NOT intended to be instructional videos, just show that even TOM can do it, and not break anything. And it can be fun!!
    Last edited by Cobrajet : 06/26/2009 at 05:13 PM Reason: Added link for window removal.
    Gregg
    2001 Proton Yellow #1379

  11. #41
    Member Since
    Feb 2007
    Location
    2000 Proton VX - 0776
    Posts
    9,258
    Thanked: 0
    Here is my response to some questions about VX KAT's pix of Tim installing her brackets:

    1. What is he using in Pic 9 to remove the old bracket? It looks like a small sawzall.

    That's funny. I never really looked at the pictures till you asked (they are of Tim installing the brackets on VX KAT's). I thought I was being creative when I used a rotary tool to make that very same cut using a drywall bit. It looks like he's using a dremmel. You may be able to skip this step if you want. Just slide a razor blade under the tab & cut through the glue on both sides of the glass. Of course if that doesn't work, you'll have to make the cut (but several of the tabs actually fell off when we removed the window from the door). If you have to make the cut, it helps to break the tab to give yourself more room to work.

    2. On Pic 10 is the SBC bracket mounted 1st using both bolts to the regulator?

    That's how I did it. Leave the bolts 'wobbly' loose at this point though. Once the adhesive is applied and the glass dropped into the slot, roll the window up to make sure everything is aligned. Only tighten the bolts with the window in the up position.

    3. It looks like on Pics 11 & 13 the glue is applied first then window is dropped into the glue using the guides on the glass to the bracket?

    Yes it is. You'll want a good bonding surface so apply the adhesive liberally and let it squish out. Remember, adhesive that you can scrape off after the install isn't providing any bonding strength so you can leave it in place or clean it off (your preference). On all 4 of the windows that we did, I bolted in the brackets first and then added the adhesive (I don't know why). In retrospect I should have put the adhesive in the bracket first since the center post on the regulator is kind of in the way and makes it difficult.

    4. On pic 15 the bracket bolt is off and don?t know why?

    Yer right. The bolt isn't there but it looks like it is in the next picture. I don't know why he removed it for that step - it doesn't need to be.

    5. What is pic 17 trying to show?

    I'm not sure. If I had to guess, I'd say that he's showing that the weather strip is not properly bonded to the front channel. Or maybe he's showing the marks from where she had previously widened her channel.

    From what I've seen, fixing the window is a combination of things. The SBC brackets are the largest contributor though. Mine still tilts so I've got to open it back up & try some of the other fixes. I need to add a couple of washers between the SBC bracket and the mounting arm (CSTYLES did that after the install & fixed the last of his problems), this forces the regulator against the center guide and relieves stress from the guide tabs which are also breaking. Widen the front channel to take out the remaining binding. There's supposed to be an adjustment that will allow you to push the front channel forward slightly to keep it from binding on the edge of the glass.

  12. #42
    Member Since
    Feb 2007
    Location
    2000 Proton VX - 0776
    Posts
    9,258
    Thanked: 0
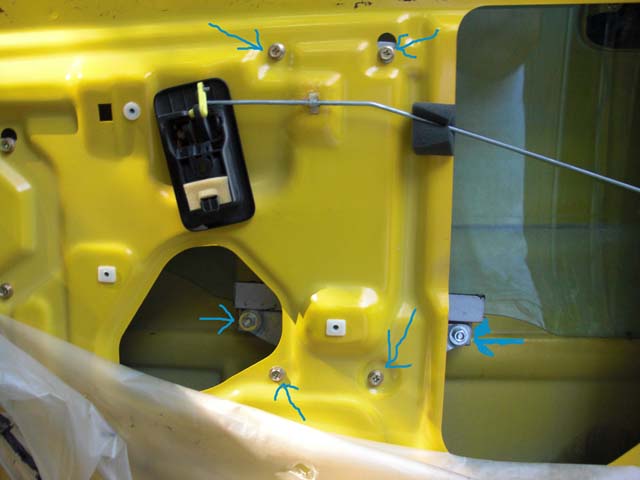
    I finally got my passenger window working (acceptable but not perfect). It still tilts but not enough to come out of the rear weather stripping. I tried widening the front channel - No Go. I tried adjusting the front channel both forward and back - No Go. What worked for me was to add some washers in key locations to force the window guide against the regulator (not sure if I'm using the right terms) - basically the part that slides up & down the center post.

    Each of the 6 bolts got 2 washers except the top 2. I could only fit 1 washer between the door panel and the center post there.


  13. #43
    Member Since
    Feb 2006
    Location
    2001,Kaiser Silver, VX, 0563
    Posts
    4,767
    Thanked: 0
    tom posted his own picture!!

  14. #44
    Member Since
    Mar 2009
    Location
    2000,Proton yellow,X74,0513
    Posts
    151
    Thanked: 0
    Tom, I had the same results when I did mine..the window still tipped down in front when going up. I used a Dremel and elongated the front hole about 1/4 inch in the SBC bracket making the hole lower. When tightening the bolts I just force the wndow up in the front bringing the bolt down into the elogation then tightening both bolts. That causes all the slack in the guides to be taken up and puts more lift in the front. That combined with widening the track a bit, forcing the front guide forward a bit and silicone slickem my windows work great. I know you will find the "sweet spot" eventually.

  15. #45
    Member Since
    Feb 2007
    Location
    2000 Proton VX - 0776
    Posts
    9,258
    Thanked: 0
    Travelin2,

    Thanks dude. I'm not going to open it back up for any more adjustments right now. If it starts jumping tho, I'll give your trick a try.

    Eric,

    Don't make me come up there & learn you some manners.

    BTW, my hands aren't as shakey as the arrows in the pic would lead you to believe. I was using a trackball instead of a mouse.

Similar Threads

  1. P0 party came
    By tjh in forum VX Troubleshooting...
    Replies: 6
    Last Post: 03/26/2013, 09:10 PM
  2. It's a paJamas party!!
    By MSHardeman in forum VX Talk...
    Replies: 18
    Last Post: 06/10/2011, 07:00 AM
  3. My Window Fix Party!
    By VXNIT in forum VX Talk...
    Replies: 3
    Last Post: 07/20/2009, 06:09 AM
  4. Democratic party
    By rowhard in forum VX Talk...
    Replies: 26
    Last Post: 03/27/2008, 01:11 PM
  5. Democratic party
    By rowhard in forum Archives
    Replies: 22
    Last Post: 03/06/2008, 04:22 PM

Posting Permissions

  • You may not post new threads
  • You may not post replies
  • You may not post attachments
  • You may not edit your posts
  •  
$lv_vb_eventforums_eventdetails