Page 1 of 2 1 2 LastLast
Results 1 to 15 of 26

Thread: VX Restoration Begins!

Hybrid View

Previous Post Previous Post   Next Post Next Post
  1. #1
    Member Since
    May 2006
    Location
    SOLD!
    Posts
    7,257
    Thanked: 2

    VX Restoration Begins!

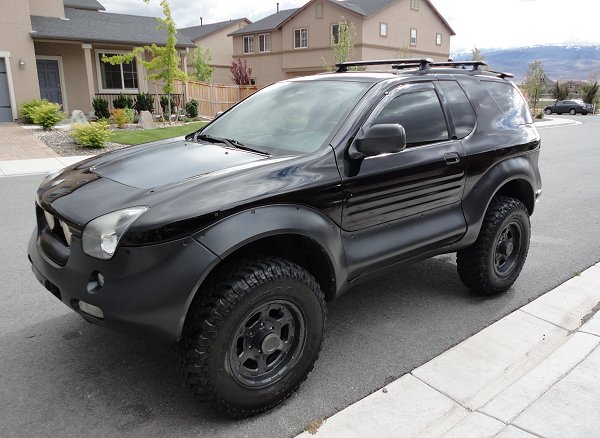
    So as some of you know, my VX sustained some pretty nasty tree rash during a camping trip in 2009 (yeah, that long ago). I've toyed with the idea of getting a complete repaint, but I wanted to see how much I could polish out myself. So I bought this kit:

    http://www.autogeek.net/griots-rando...al-buffer.html

    I watched the DVD and went at it Sunday. I am pleased to say that almost ALL of the scratches came out, including some of the really nasty ones. I think if I step up to the next level polish I should be able to get the scratches out completely.

    I still need to get the hood and tailgate fixed up, because the hood is COVERED with small rock chips and the tailgate has had a dent in it since I bought the VX back in '06. Anyway, I highly recommend this kit to anyone who wants to bring their paint job back to looking awesome, especially for you out there who have not played as hard as I have.

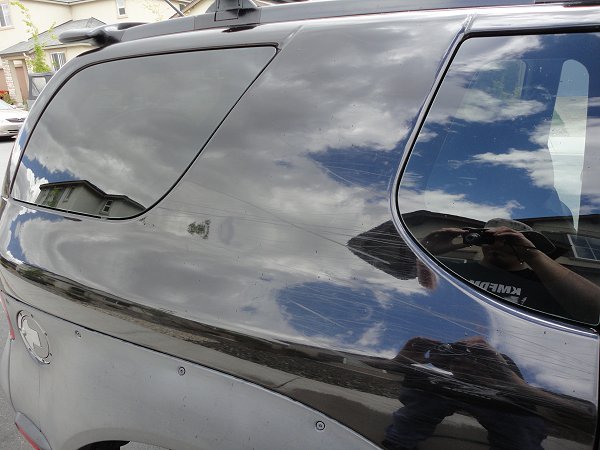
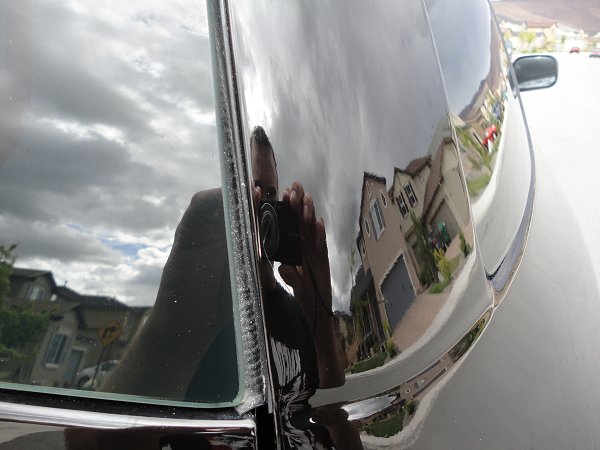
    Before: Heavy tree scratches on passenger side:


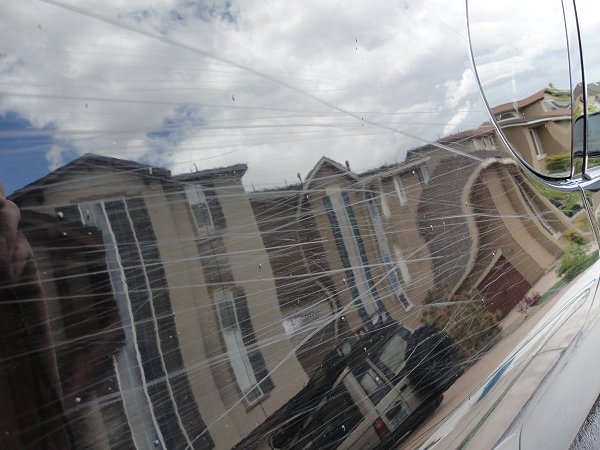
    Before: Heavy damage on passenger side in front of mirror:


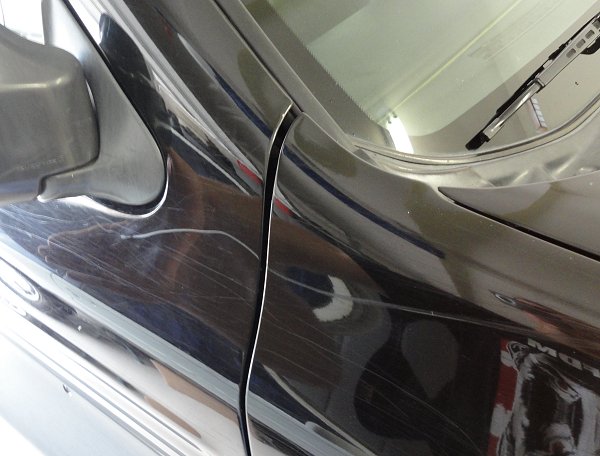
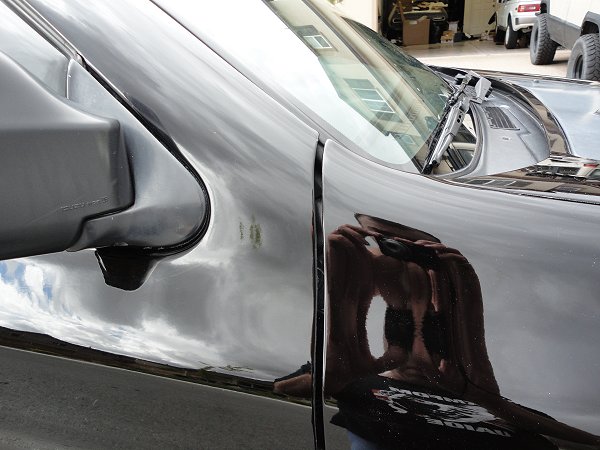
    Before: Door scratches:


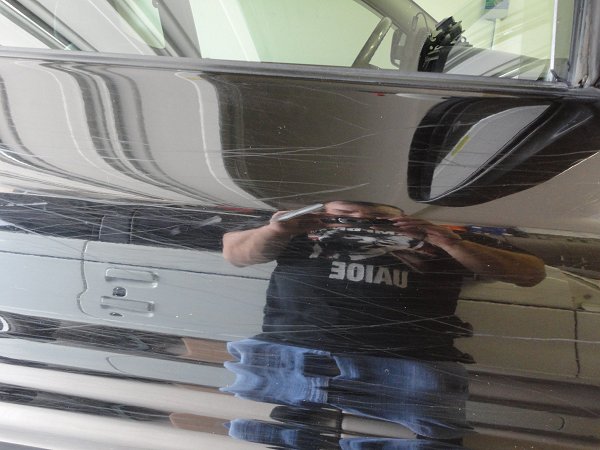
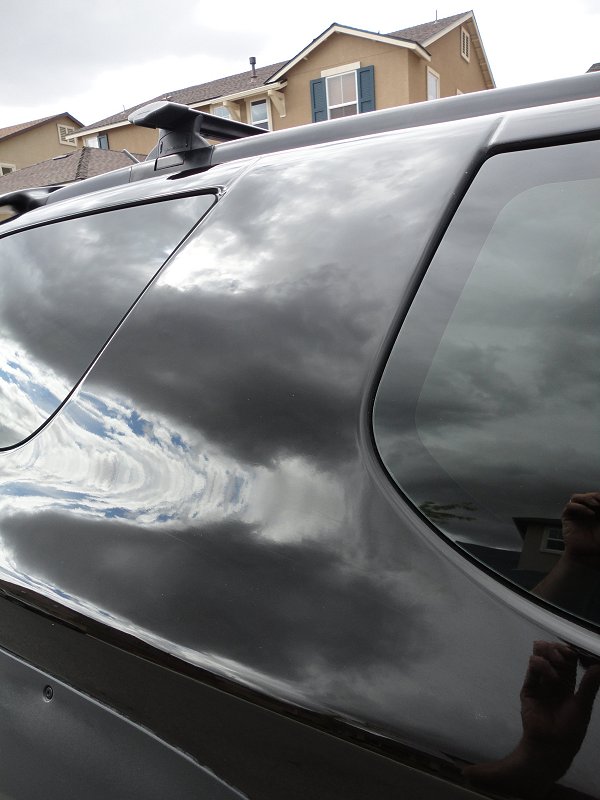
    After: Good washing, full clay bar on entire paint job, and polishing:


    Here, you can see the same areas, almost completely scratch free!!!


    Next step, will be to get the leaks fixed and the hood and tailgate resprayed. Then she will get a new hood insert and headlights installed, and become a full time garage queen....

    Bart

  2. #2
    Member Since
    Dec 2008
    Location
    Former owner 2001, Foxfire Red, #0663
    Posts
    7,311
    Thanked: 33
    Awesome Bart! Having done a ton of severe rash removal on Dave's FJ, and some on mine, that is absolutely fantastic results...especially on black! I might look into some of these products to re-do his FJ, as I know it can be improved.
    Since doing the FJ about 2 yrs ago, I've discovered Mequiar's Medium Cut and some 3M rubbing compound and another 3M product which are more aggressive. Worked great on my VX, but always willing to try new stuff. Have never done a clay bar....I should try that too.
    VX KAT
    ....the adventure BEGINS ANEW! ...2015......
    Remember that life is not measured in the breaths you take, but rather in the moments that take your breath away.

  3. #3
    Member Since
    May 2006
    Location
    SOLD!
    Posts
    7,257
    Thanked: 2
    Yeah, it looks even better in person.

    The clay bar is pretty amazing actually. It will make your paint feel like a new piece of glass. Griot's Garage sells this stuff called "Speed Shine" that you use with the cleaning clay. It works really well and if you decide to try a clay bar, I definitely recommend the Griot's Garage clay and the Speed Shine. It worked really well. I'd say the whole process only took me about 3-4 hours.

    I just order a bunch more of their stuff including the #2 polish.

    I can't wait to polish and wax the Impulse. The paint on it is in really good shape so I bet the car will look amazing when done.

    Bart

  4. #4
    Member Since
    Dec 2008
    Location
    Former owner 2001, Foxfire Red, #0663
    Posts
    7,311
    Thanked: 33
    Quote Originally Posted by nfpgasmask View Post
    Yeah, it looks even better in person.

    The clay bar is pretty amazing actually. It will make your paint feel like a new piece of glass. Griot's Garage sells this stuff called "Speed Shine" that you use with the cleaning clay. It works really well and if you decide to try a clay bar, I definitely recommend the Griot's Garage clay and the Speed Shine. It worked really well. I'd say the whole process only took me about 3-4 hours.

    I just order a bunch more of their stuff including the #2 polish.

    Bart
    I just got my Griot's clay bar & Speed Shine today. I didn't buy any of their polishing/rubbing/etc...since I have a bunch of stuff already.

    What step was right after the clay bar?

  5. #5
    Member Since
    May 2006
    Location
    SOLD!
    Posts
    7,257
    Thanked: 2
    Quote Originally Posted by VX KAT View Post
    I just got my Griot's clay bar & Speed Shine today. I didn't buy any of their polishing/rubbing/etc...since I have a bunch of stuff already.

    What step was right after the clay bar?
    After I clayed everything, I did the polishing.

    Bart

  6. #6
    Member Since
    Apr 2004
    Location
    2000, Ebony, VX, 0370
    Posts
    2,503
    Thanked: 12
    My typical detailing process is:
    1. Wash with Dawn (gets rid of old wax)
    2. Clay bar
    3. Wash to get rid of clay bar residue
    4. Anti-swirl wax (slight abrasive to get rid of swirls in dark paint)
    5. Wax (1st coat)
    6. Wax (2nd coat)
    7. Wax sealer (really locks a deep shine in)
    ....and that's just for the metal parts of the VX....

    After all that Vicki ends up looking like an oil slick.
    "The major difference between a thing that might go wrong and a thing that cannot possibly go wrong is that when a thing that cannot possibly go wrong goes wrong, it usually turns out to be impossible to get at or repair."
    -Douglas Adams, Mostly Harmless

  7. #7
    Member Since
    Dec 2005
    Location
    Former Owner of 'ZEUS' aka 1031
    Posts
    3,185
    Thanked: 1
    DAMN! That looks worlds different! And you thought you were going to have to repaint the whole thing... good work!
    Sent from my "two hands on a keyboard"

  8. #8
    Member Since
    Feb 2009
    Location
    1999,silver, 1516
    Posts
    905
    Thanked: 0
    Quote Originally Posted by ZEUS View Post
    DAMN! That looks worlds different! And you thought you were going to have to repaint the whole thing... good work!
    What he said. I've contemplated getting that setup several times in the past but always talk myself out of it. I've seen it done and it doesn't look that difficult. Now that you've done it, is it much simpler and less imitating than it seemed before you started?

  9. #9
    Member Since
    May 2006
    Location
    SOLD!
    Posts
    7,257
    Thanked: 2
    Quote Originally Posted by ZEUS View Post
    DAMN! That looks worlds different! And you thought you were going to have to repaint the whole thing... good work!
    Thanks!!! And iirc, you have seen the tree rash first hand, so you know how BAD it was.

    Quote Originally Posted by samneil2000 View Post
    What he said. I've contemplated getting that setup several times in the past but always talk myself out of it. I've seen it done and it doesn't look that difficult. Now that you've done it, is it much simpler and less imitating than it seemed before you started?
    Honestly, it is SUPER, DUPER, UBER easy. The worst part is that the vibration of the buffer will get to your hands after a while. You need to hold on to that sucker tight. And if you watch the DVD (I watched it once after work and then again right before I started just to make sure I had it right) you will have no problem at all. IMO, this kit is well worth the money, and even someone with no power tool experience can do this. The results are immediate. For some of the really bad scratches I had to make multiple passes and press into the paint a little more than normal but it really makes a huge difference. You just have to make sure you have the pad against the paint when the buffer is on, if you lift the buffer off the paint while it is on, you will certainly spray polish everywhere, and then you need to use some elbow grease and more Speed Shine to clean it off. Anyway, apply a good coating of Stoner Trim Shine on the cladding, and you will have a sick lookin' VX again!

    I also ordered the 3" buffer today, because the 6" buffer is a little too big for the pillars and the area above the windows on the side and a few other spots. Plus I ordered the glass polish so I can do my windsheild. I don't know why it took me so long to invest in this stuff, because it really is worth the result. I'll be doing the wife's 911 soon and the Impulse as well.

    Bart

  10. #10
    Member Since
    Aug 2008
    Location
    2001, PROTON YELLOW, VehiCROSS, 1451
    Posts
    1,955
    Thanked: 0
    Quote Originally Posted by nfpgasmask View Post
    Anyway, apply a good coating of Stoner Trim Shine on the cladding, and you will have a sick lookin' VX again!
    Here ya' go, Grif.


  11. #11
    Member Since
    Oct 2009
    Location
    99 Astral Silver
    Posts
    343
    Thanked: 0
    Speaking as a detailer, you did a damn good job. Black is absolutely the hardest color to get looking good. Excellent work!

  12. #12
    Member Since
    May 2006
    Location
    SOLD!
    Posts
    7,257
    Thanked: 2
    Quote Originally Posted by RabidPony View Post
    Speaking as a detailer, you did a damn good job. Black is absolutely the hardest color to get looking good. Excellent work!
    Thanks!!! I'll be honest, it was really nothing!! I think detailing the interior is harder work than this polishing!!!

    Bart
    Last edited by nfpgasmask : 06/07/2011 at 03:57 PM

  13. #13
    Member Since
    Dec 2006
    Location
    2001, Foxfire Red Mica, VX, 1343
    Posts
    317
    Thanked: 0

    Thumbs up

    I concur with regard to the Griot's system and had posted some results a few years ago: http://www.vehicross.info/forums/sho...ghlight=griots

    A bit of an investment up front, but great results, particularly on harder to maintain darker paint colors.
    Bren Workman
    Gretna, NE
    (C) 402-312-1992

    [SIGPIC][/SIGPIC]

  14. #14
    Member Since
    Aug 2010
    Location
    01 Foxfire Red Mica VX 0441
    Posts
    916
    Thanked: 0
    Wow, what a difference. You can't even tell it was covered in scratches.
    "THEORETICALLY, STILL A TRUCK!"
    2001 VX
    Mods

    2008 HUMMER H3

  15. #15
    Member Since
    Mar 2010
    Location
    2001 Ironman 0588
    Posts
    1,176
    Thanked: 0

    Thumbs up

    Those "before" pictures made my heart sink. I'm completely amazed by the results - never would have thought those scratches would come out!


Similar Threads

  1. And so it begins...
    By jeeperkate in forum VX Modifications...
    Replies: 60
    Last Post: 07/13/2012, 02:43 PM
  2. Moab 2012: The Journey Begins
    By vt_maverick in forum VX Talk...
    Replies: 36
    Last Post: 06/04/2012, 10:39 AM
  3. And so it begins...
    By Buffy in forum VX Talk...
    Replies: 138
    Last Post: 08/21/2011, 02:08 PM
  4. ...and so it begins!
    By alterastro in forum VX Modifications...
    Replies: 9
    Last Post: 06/19/2009, 02:58 AM
  5. and the silence begins...
    By ISCE in forum VX Talk...
    Replies: 10
    Last Post: 05/14/2008, 07:56 AM

Posting Permissions

  • You may not post new threads
  • You may not post replies
  • You may not post attachments
  • You may not edit your posts
  •  
$lv_vb_eventforums_eventdetails