Page 1 of 3 1 2 3 LastLast
Results 1 to 15 of 31

Thread: CV Boot Replacement Plan - Correct me where I am wrong

  1. #1
    Member Since
    Jan 2009
    Location
    1999, Ebony Black, VX, 1614
    Posts
    1,852
    Thanked: 1

    CV Boot Replacement Plan - Correct me where I am wrong

    I think my VX knows that MOAB is coming in 2 months and I will have to drive it 3k miles. The EGR valve was sticking open and causing a bad idle so I replaced that ( pricey, but easy). Now, after no lift or big offroad trips, I happen to realize that my CVboot is torn on the passenger side. ARGH!!! Darn you murphey's law! I noticed it when doing a brief undercarriage inspection. No noises yet so I think I just need to replace the boot. I have done my fair share of searching, and I think my game plan will be as follows. Please give me advice or course corrections where necessary. Thank you thank you....

    Outer passenger boot is torn, inners and driver side seem fine. So I plan on following the instructions laid out HERE by Mr. JohnnyApollo and using the pictures and applicable notes from the pdf that was created by The Triathlete HERE.

    I plan to purchase the 4 boot kit from independent 4x4 HERE

    I then plan to replace both inners and both outers before going to MOAB.

    Here are my questions in addition to the overall "is this a good plan" question...

    1. Should I just replace the broken boot, or is it a good idea to go ahead and preemptively replace all of them?

    2. Are the mechtech boots the best way to go?

    3. Should I avoid driving the VX at all until I repair the problem?

    4. I am assuming when the indy4x4 site says 4 boot kit, it means 2 inners and 2 outers....Correct??

    5. What am I missing?

    Thanks for all your help. Consider this a time saver so I dont have to bug people for help at the stoop in 2 months.

  2. #2
    Member Since
    Jun 2002
    Location
    1999, Ebony, VX, #1679
    Posts
    8,422
    Thanked: 3
    1. While you have it apart might as well do all 4. If 1 split the others aren't to far away. 15 year old rubber!
    2.Some have had good luck with them others haven't. When I did mine I used Dormans and they held up great and are a lot cheaper. The Mecha's are a lot "flexier" whi h eases installation.
    3. I would drive as little as possible. Split boot introduces dirt/grit and throws all your grease out (dry bearings).
    4. The indy kit is complete...comes with all you need. Roward just used this kit a week ago.
    5. Nothing...if all goes smooth it will take about 4-5 hours to do both sides. Give yourself a weekend in case you run into issues (rusty bolts).
    Good luck
    Billy Oliver
    15xIronman
    My Sponsors:
    Accelerate3Coaching
    TriSports.com (PM me for 1 time use 20% off code)

  3. #3
    Member Since
    Nov 2004
    Location
    1999 Ex-Ebony..Fully Line-X'd ..0189...THE "ORW".....matching Line-X'd Trailer made from a written off 2001 Ebony.
    Posts
    4,403
    Thanked: 14
    X2 on the Dormans.

    I have had them for years..

    # 614-001 DOR = OUTER

    #614-002 DOR = INNER.

    If you pack with grease and wrap with duct tape..
    ...driving with ruptured boot is OK for a while.

    All four is a good plan..though 'usually' outers tear ...
    ..because more extreme angle.

    Jo
    VX.info...PLEASE SUPPORT THIS SITE WITH YOUR VOLUNTARY $20 DONATION...
    Absolutely the best $20 you'll spend per year on your VX.


    ~ ~ > OFF ROAD WHORE <~ ~
    [SIGPIC][/SIGPIC]

  4. #4
    Member Since
    Jan 2005
    Location
    2001, Ebony Black, 1153
    Posts
    2,264
    Thanked: 2
    My opinion is only replace the damaged one. The stock boots are by far superior to any replacements. Buy the Dormans but I would not worry about inner or outer, just get the one that is cheaper. Last time I bought them one was twice as much as the other and the only real difference is color, black or grey. Don't need a kit or anything. Just buy two boots (in case you mess the other one up in removal) additional CV grease, and some heavy duty zip ties. If you try and use the metal CV boot clamps, good luck. They take forever to get right, even with the correct tool, and then they might still decide to cut the boot, haha. I just use the HD zip ties and they have lasted longer and better for me personally.

  5. #5
    Member Since
    Jan 2009
    Location
    1999, Ebony Black, VX, 1614
    Posts
    1,852
    Thanked: 1
    Ok, so I could buy the dormans and replace as needed using HD zip ties. I could see your point about the metal causing more damage than good if I dont do it right. Is that what others have done too?

    This would be the much cheaper option and if they dont work out, I can always buy the more expensive stuff second. What kind of grease do I get? I read that the grease that comes with the dormans is not nearly enough.

    I do have 2 used OEM boots coming to me in MOAB from the wonderful VX Kat, so I could then keep those as spares as the others rip. I like the idea of replacing everything with new, but not if they are worse than the old ones.

  6. #6
    Member Since
    Nov 2004
    Location
    1999 Ex-Ebony..Fully Line-X'd ..0189...THE "ORW".....matching Line-X'd Trailer made from a written off 2001 Ebony.
    Posts
    4,403
    Thanked: 14
    I never had an issue with the quantity of grease that comes with the Dormans.

    I've used the metal band & zip tie option...

    ..metal is a PIA!

    Heavy duty Zips snugged into grooves works well

    jo

  7. #7
    Member Since
    Dec 2005
    Location
    2001, Dragon Green, 1342
    Posts
    2,393
    Thanked: 0

    Talking

    Quote Originally Posted by Triathlete View Post
    4. The indy kit is complete...comes with all you need. Roward just used this kit a week ago.
    Yep, the kit comes with grease, lub for the cone, metal straps, and the cone and 4 boots. (didn't use the cone since I completely remove the shaft and disassembled end to properly clean it) , All in all, a real PITA, but you will save a bunch of money doing it yourself.

    The one trick I did learn that I didn't see mentioned anywhere was on the inner boot. Secure the small end AFTER you have secured the big end to the inner green cup. Why, it gives you the ability to burp the boot by slipping a small flat tip screwdriver under it and removing any deformity of the boot. I did find that the boots were a bit too long and had to extend it past the grove on the axle shaft so it didn't chaff on the metal band. Billy mentioned that he heard others had to do that too. There were no instructions with the kit, but you can find many 'how to' on the net including a mecatech vid. Have fun
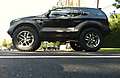
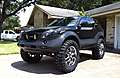
    Greetings, Earthling. We come in peace... Never mind "Paris to Dakar", the VehiCROSS looks ready for the Martian desert.

  8. #8
    Member Since
    Jan 2009
    Location
    1999, Ebony Black, VX, 1614
    Posts
    1,852
    Thanked: 1
    Does the dorman boot come with a cone tool to put the outer boot on? If not, how do I get the outer boot on without taking the joint apart?

  9. #9
    Member Since
    Dec 2008
    Location
    Former owner 2001, Foxfire Red, #0663
    Posts
    7,311
    Thanked: 33
    Quote Originally Posted by JAMAS View Post

    I do have 2 used OEM boots coming to me in MOAB from the wonderful VX Kat, so I could then keep those as spares as the others rip. I like the idea of replacing everything with new, but not if they are worse than the old ones.
    Jon I also have for you a used Passenger inner boot (CarQuest brand) used for about 1 year. If you need that one now if it would help, just holler and I can ship it.
    VX KAT
    ....the adventure BEGINS ANEW! ...2015......
    Remember that life is not measured in the breaths you take, but rather in the moments that take your breath away.

  10. #10
    Member Since
    Dec 2005
    Location
    2001, Dragon Green, 1342
    Posts
    2,393
    Thanked: 0
    Quote Originally Posted by JAMAS View Post
    Does the dorman boot come with a cone tool to put the outer boot on? If not, how do I get the outer boot on without taking the joint apart?
    Having only done it once which makes me an expert
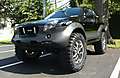
. Think it would be more of a PITA then the job already is. You might be able to do it the way I did the rancho shock boots, http://www.vehicross.info/modules.ph...warticle&id=33, but it would be a really big PITA trying to get enough screwsticks and fingers in there to do it and always the chance of ripping the new one. But, where there's a will there's a way of course. Could loan you mine if you can wait that long or would think any parts house could order one over night if they don't have it on the shelf and then you would have it next time.

  11. #11
    Member Since
    Nov 2004
    Location
    1999 Ex-Ebony..Fully Line-X'd ..0189...THE "ORW".....matching Line-X'd Trailer made from a written off 2001 Ebony.
    Posts
    4,403
    Thanked: 14
    No cone...

    Quote Originally Posted by JAMAS View Post
    Does the dorman boot come with a cone tool to put the outer boot on? If not, how do I get the outer boot on without taking the joint apart?
    You have to take apart to fit these.

    Its not that bad...
    ...its been done several times on the stoop after a days wheeling.

    Jo

  12. #12
    Member Since
    Jan 2005
    Location
    2001, Ebony Black, 1153
    Posts
    2,264
    Thanked: 2
    Uh, it takes less time to take apart the CV assembly then mess with that cone. It is not complicated, you are just talking about a few parts:
    1) "C" clip
    2) ball bearings
    3) Outer Cage (has tapered head that needs to go in thick head towards engine, narrow end toward middle of CV shaft)
    4) Inner Cage (has receased lip and will only go on one way flush)

    Super easy, just slowly disassemble, clean, and reassemble. It is so simple and easy once you have done it a few times, I would never think about the cone thing. Just disassemble and reassemble. The grease that comes with the Dormans is great, but I always like to repack the inner even when I am not replacing the CV boot.

  13. #13
    Member Since
    Jun 2002
    Location
    2001, Proton Yellow, #0580
    Posts
    1,887
    Thanked: 5
    No problems with mine so far....
    John Eaton
    Original Owner
    2001 Proton Yellow #580
    Atlanta GA

    http://wildtoys.com/vehicross/
    http://vehicross.blogspot.com/

    "Metaphors be with you"

  14. #14
    Member Since
    Feb 2007
    Location
    2000 Proton VX - 0776
    Posts
    9,258
    Thanked: 0
    I've used Mecha-Tech's ... they tore.

    I've used Dorman ... they tore.

    I ended up with some very OEM 'like' boots from Advance Auto that ended up lasting. I also thought that there was not enough grease provided so I just picked up synthetic axle grease & packed them very heavily.

    X2 on the zip ties. The metal bands are a PITA. If you are going to re-use the old boots that aren't damaged, be very careful cutting off the old metal bands (it's easy to cut the boot in the process).

    I've never used the cone. Once you open the inner CV, the boot for the outer CV will be easy to install without the cone.

    Also make sure you have at least 4 cans of brake cleaner & several rolls of blue paper towels. The job will be messy & you'll want to get as much of the old grease cleaned out as possible. If you don't have an air compressor, beg/borrow/steal or rent one. It'll help a lot to keep spraying out the grease/brake cleaner to get it all.

    Also, pick up a pitman arm puller from Harbor Freight to get the ball joints seperated. The adjustable arm ones don't work well at all. Also spray everything down with PB Blaster the day before you get started.

    I highly recommend that you have some anti-sieze on hand as well. Anything that you have a hard time removing should be coated with it during re-install since it sounds like you'll be doing it again in the future.

    A couple of large punches or screw drivers are also helpful in aligning the Upper Control Arm bolt holes during re-assembly.
    [SIGPIC][/SIGPIC]

    Put a smiley after you say that Bub.

  15. #15
    Member Since
    Jun 2002
    Location
    1999, Ebony, VX, #1679
    Posts
    8,422
    Thanked: 3
    Tom...no need to seperate ball joints. You just remove the 4 bolts that mount it to the control arm. Much easier.

Similar Threads

  1. can anyone tell me if this is the correct part?
    By VehiTONY in forum VX Troubleshooting...
    Replies: 8
    Last Post: 04/27/2014, 12:27 PM
  2. CV Boot Replacement - Problems removing control arm bolts
    By RedBlur in forum VX Troubleshooting...
    Replies: 12
    Last Post: 01/06/2014, 04:38 PM
  3. If you plan on an ARB for the rear of your VX...
    By Triathlete in forum VX Talk...
    Replies: 30
    Last Post: 11/11/2009, 10:17 AM
  4. CV Boot Replacement...or how to save $1600!!!!
    By Triathlete in forum General Tips...
    Replies: 57
    Last Post: 01/12/2009, 01:34 PM
  5. Correct storage bin p/n to replace changer?
    By Tone in forum VX Modifications...
    Replies: 16
    Last Post: 03/14/2005, 04:24 PM

Posting Permissions

  • You may not post new threads
  • You may not post replies
  • You may not post attachments
  • You may not edit your posts
  •  
$lv_vb_eventforums_eventdetails