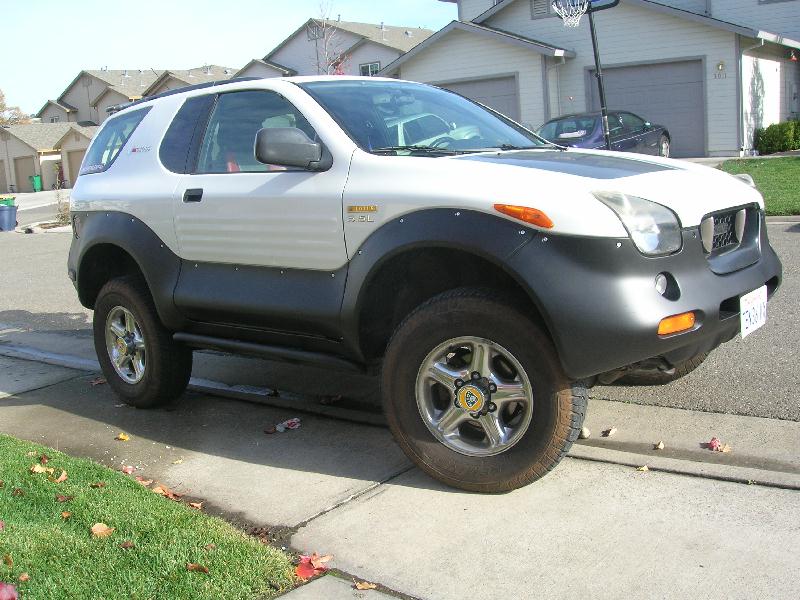
I painted my cladding today with flexible bumper paint.
I didn't like the faded plastic look.
While I had the bolts out I sprayed them silver. (not sure if I like them silver)
Last week I painted the calipers and debadged.


Here is the Before:


 VXer
VXer
I painted my cladding today with flexible bumper paint.
I didn't like the faded plastic look.
While I had the bolts out I sprayed them silver. (not sure if I like them silver)
Last week I painted the calipers and debadged.
Here is the Before:
Last edited by Mark Miller : 08/29/2006 at 09:22 PM

Ooooo, I likey!

Last edited by Anita : 08/29/2006 at 06:32 PM
Anita
2000 Ebony #263
Original Owner- love her too much to part with her.
AnitaProtich.com
 Super VXer
Looks very nice, The Cladding bolts look good also.
[SIGPIC][/SIGPIC]
" Jeeps are nice, Barbie has one"
 Member
Wow, looks great!
I assume you took all cladding off before you painted, did't you?
How much did it cost to you?
VXer
very nice.............quick how-to right up? Which specific paint?
 Super VXer
wow.. looks very nice.. please share the details!
VXer
Thanks
I guess I can do a little right up on how I did it.
It took a couple of hours with a friend and it was done in my back yard.
The cost very cheap everything available at Wal-Mart.
$37.76 Total Spent Before Tax
$23.22 For 6 Spray Cans Dupli-Color Bumper Coating
$ 4.74 For 1 Quart Klean Strip Prep-All Wax & Grease Remover
$ 6.77 For Masking Tape Blue 2inch I had a roll of �� that was free.
$ 2.63 For A Plastic Drop Cloth

Tools used were a screw gun with a Philips bit, a T-30 bit, and an alan bit (size?)
The T-30 for the cladding, the alan for the fuel door, the Philips for the lights.
Remove the front turn lights, rear taillights, gas cap door assembly.
(you might want to tape off the gas door there are some nuts that will fall out)
The round front parking lamps, rear round reflectors, and headlights were taped off.
Remove the cladding bolts around the top of the cladding and in the door sills.
Remove car tag/plates.
Use a Scotch Brite pad and rub down the cladding (I didn't do this but you might want to)
Clean the cladding using the Prep All Wax and Grease Remover.
Tape off around the top of the cladding.
Using two layers of tape so it tapes off about 3.5 inches up from the cladding.
Some places you can slide the tape behind the cladding.
I even taped off the door handles and the half moon on the back door and painted them.
I removed the aluminum fangs from the front grill. Painted the grill also.
I used the drop cloth to lay over the wheels and tires.
Paint the cladding; I did two coats, first a light mist then a second thick coat. You can do a third mist also.
For the heck of it I sprayed the cladding bolts with Silver BBQ paint.
Removed the tape, be careful it can fall and stick to new painted area.
Put everything back on and you�re done.
It is possible that I might have omitted something, I�m sleepy.
I did this same thing on my Jeep Wrangler a couple of years ago and it held up very well.
Last edited by Mark Miller : 09/05/2006 at 07:20 PM
 Super VXer
Looks good
Can you please make a follow up post in a few months so we can see how well this holds up to the elements and every day use.
Live Free or DIE!
 Super VXer
I really liked how Mark's cladding paint looked so I did it for myself a couple weekends ago. I got a little sloppy in a few spots but nothing I cant live with. I however only used 4 1/2 cans of paint. That left me with some touch up paint for the future. While I was at it I painted the cladding screws silver for contrast and rebadged her as a Lotus. Started getting comments (more than ussual) the next morning.
This weekend I used some of the left over paint to coat the hood insert, which turned out fabulous. Prep'ed it with Bulldog. I also tested the paint's durability with a little off-roading. It held up good. Only a few scrapes on the front piece but nothing so bad that I had to get a can out and cover it right away (you only really see it in direct sunlight).
Next paint project is the wiper arms and re-chrome the pillar badges, redden the callipers...


Last edited by TEN36VX : 12/05/2006 at 02:27 PM
1999 Lotus VX Ironman Edition
It's fun to rebadge...
 Posting Permissions

 Reply With Quote